(https://tech.aufomm.com/the-ultimate-guide-of-using-jwt-with-kong/ translated)
:::note This article may not be the truly “ultimate” guide, but it aims to thoroughly explain the official Kong plugins available for JWT validation. By the end, you should have a comprehensive understanding of the available options and be able to choose the best plugin for your use case. :::
Background
JSON Web Tokens (JWT) are essential in web development, serving as a secure way to transmit important information between systems. To ensure their reliability, JWT validation is a crucial step. Meanwhile, API gateways like Kong play a key role in modern API architectures, especially as OAuth 2.0 and OIDC standards become widespread.
This article provides a detailed explanation of the tools for JWT validation in Kong and explores the role of this process in today’s web development environment.
What is JWT?
:::note If you already understand JWT, you can skip the details of which plugin to choose and proceed to the next section. :::
A JSON Web Token (JWT) consists of two formats: JSON Web Signature (JWS) and JSON Web Encryption (JWE). This article focuses mainly on JWS validation. For JWE validation, see here.
According to RFC7515, a JSON Web Signature (JWS) is a JSON-based data structure representing content protected by a digital signature or Message Authentication Code (MAC). In simple terms, a JWS is like a “signed letter” containing important information. To ensure its trustworthiness, the signature must be validated.
Algorithms
The cryptographic algorithms and their identifiers used in JWS are defined in a separate specification, JSON Web Algorithms (JWA) JWA. These algorithms are also listed in an IANA registry based on the JWA specification.
As a best practice, asymmetric algorithms like RS256 or ES256 are recommended. Symmetric algorithms like HS256 are generally discouraged.
JWT Data Structure
Let’s look at the structure of a JWT. Here is an example:
eyJhbGciOiJFUzI1NiIsImtpZCI6Imh1SEE3RDVaTUNKTWhLaVJIZVgwaGZSWG9fX1VBbEpCZ0FkTjhxb0MwMXcifQ.eyJpc3MiOiAiZm9tbSIsICJhdWQiOiAiand0LWRlbW8iLCAic3ViIjogImRlbW8tdXNlciIsICJpYXQiOiAxNjcyNDAzMzc4LCAiZXhwIjogMTY3MjQwMzY3OH0.bxkLGEjN4pXQQ6eymBO_DYl24NGu07FFR1ZXgmdFYHPGsNX10r6iyqDEtCHeXWs7Hsn-QIasV_i4Lw2nCHmlAA```
JOSE header The JOSE header typically includes the hash algorithm (alg) and key ID (kid) used to protect this JWS. It often also contains the type (typ).
1
2
3
4
{ "alg": "ES256", "kid": "huHA7D5ZMCJMhKiRHeX0hfRXo__UAlJBgAdN8qoC01w" }Payload The payload is the message that is protected and passed to other parties.
1
2
3
4
5
6
7
{ "iss": "fomm", "aud": "jwt-demo", "sub": "demo-user", "iat": 1672403378, "exp": 1672403678 }Signature The user must compute the signature using the algorithm defined in the JOSE header and verify that the signature matches.
JWT Generation
JWTs are so popular that libraries are available for many programming languages. If you use an OIDC provider like Keycloak or Azure, they will generate JWT tokens automatically. This section introduces how to create JWTs using jwt-cli and Python’s jwcrypto library.
Generating an RSA Key Pair
Here, we use openssl to generate an RSA private key for signing tokens and export the public key for verification.
| |
JWT CLI
:::note
If you have nix installed, you can use nix shell nixpkgs#jwt-cli to use jwt-cli. Otherwise, refer to the official Git repository.
:::
kid
According to RFC 7515 section 4.1.4, the structure of the kid (key ID) value is not specified. It must be a case-sensitive string. This header is optional, but it is generally recommended to include kid in the JOSE header, as it helps the recipient identify which public key in the JWK to use for validation.
Here, we use a tool to generate a kid associated with a specific public key.
| |
JWT Generation
Next, generate a JWT with a simple payload as follows:
| |
JWT Validation
Since the token is signed with the RSA private key, you need to use the public key for validation. With jwt-cli, you can validate as follows:
| |
Output
| |
Python
You can install PyJWT using pip:
| |
I prefer to use nix develop. If you have nix installed, save the following as flake.nix and run the command below to set up the environment:
| |
| |
JWT Generation
Next, save the following as jwt.py. You can then run python jwt.py to create a token.
| |
JWT Validation
Validation with the jwcrypto library is very simple. Here is a sample you can use:
| |
Which Plugin Should You Use?
There are three official Kong plugins for JWT validation:
- JWT plugin
- JWT Signer plugin (Enterprise)
- OpenID Connect (OIDC) plugin (Enterprise)
If you do not have an enterprise license, only the open source JWT plugin is available. To implement this plugin, you must create individual jwt_secrets for each consumer. If you want to associate the same RSA public key with multiple consumers, make sure the key values in all jwt_secrets are unique. For details, see this blog post.
If you have access to all plugins in the enterprise version, consider the following:
- How are JWTs generated?
- If tokens are generated by an IDP (Identity Provider), use the OIDC plugin or JWT Signer plugin
- Do you need to validate JWTs issued by multiple IDPs?
- The OIDC plugin supports fetching and auto-rotating public keys from multiple JWKs, making it suitable for JWT validation
- Do you have upstream API services without internet access?
- The JWT Signer plugin allows you to re-sign tokens. The upstream server only needs to trust Kong’s public key, so fetching JWKs from the IDP is unnecessary
- Do you need to validate JWT claims?
- If you need to validate scopes, the OIDC plugin is optimal. It can validate up to four claims simultaneously
- Do you need to read token claims and pass them as headers upstream or downstream?
- In this case, use the OIDC plugin
- Do you need to validate two tokens issued by different IDPs at the same time?
- For example, if you need to validate both an access token and a channel token, the JWT Signer plugin is appropriate
- Do you need group mapping for access control?
- All plugins support consumer mapping
- However, if you want to manage developers in the IDP, the OIDC plugin can create virtual credentials based on token claims, which can be used for rate limiting and access control
If you are still unsure which plugin to choose, start with the OIDC plugin. It is the most advanced authentication plugin in Kong and offers more features than the other two, such as key rotation detection, virtual credentials, and scope validation.
You may wonder, “You strongly recommend the OIDC plugin, but can I use it even if I don’t have an OpenID Connect provider?” The answer is YES. This guide will cover that process as well.
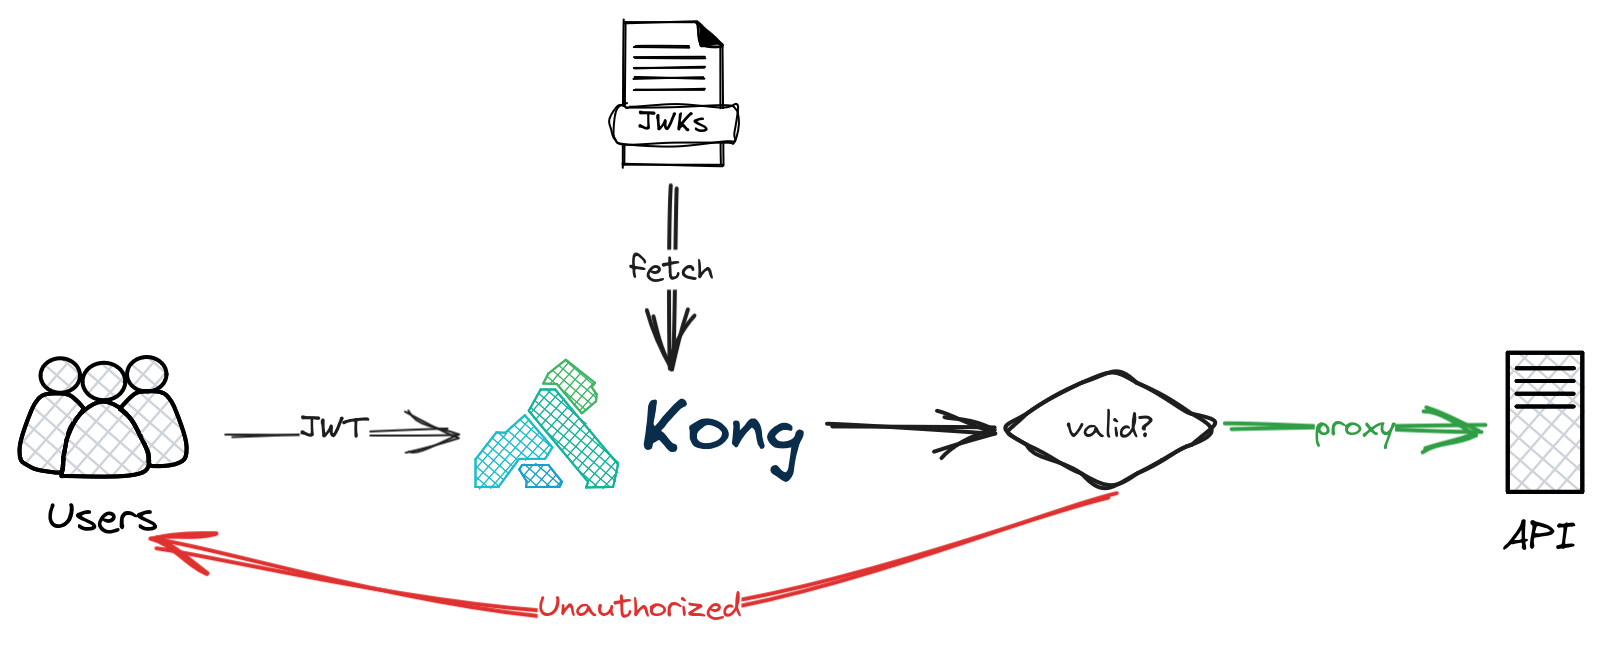
OIDC JWT validation
The mechanism is very simple. The OIDC plugin fetches JWKs, caches the public keys, and uses them for JWT validation. If the IDP rotates keys and signs tokens with a new key, the OIDC plugin will fetch the new public key from the JWK endpoint.
To check the public keys held by Kong, access <admin_api>/openid-connect/issuers:
:::note The JWT Signer works similarly, but can only fetch JWKs from a single URL and re-signs tokens. For details, see this blog post. :::
Generating JWKs
To generate a public key JWK, use the danedmunds/pem-to-jwk Docker image.
| |
Creating a Docker Network
Run containers on the same Docker network, kong-net.
| |
Hosting JWKs
Next, use json-server to host these keys.
| |
Starting Kong EE
For the demo, deploy Kong in DBless mode. Assuming you have a valid Kong Enterprise license saved in the KONG_LICENSE_DATA environment variable, you can start Kong Enterprise 3.5 in DBless mode with the following command:
| |
Preparing Kong Configuration
Save the following as /tmp/kong.yaml:
| |
This configuration does the following:
- Uses the request termination plugin to return a 200 response and echo the request
- Places all JWKs in
config.extra_jwks_urisso the OIDC plugin can fetch the keys - Lists all issuers (Python and jwt-cli commands) in
config.issuers_allowed. The OIDC plugin validates the issuer by default
Finally, you can push this file to Kong’s /config endpoint:
| |
JWT Validation
Now everything is ready, so let’s test the setup. First, generate a JWT as described above. For convenience, you can store the JWT in a token variable with the following command:
| |
Then, use this token as an authorization bearer token to call the endpoint. You should get a 200 response.
| |
That’s it for today. I hope this helps you choose the right plugin for your needs.