This artcle is a note for myself to build a private NAS station using Ubuntu
20.04. The main usage of my NAS is to store photoes.
For other services, run webmin to control machine via WebUI, and run Emby/
Jellyfin for multi media. Above 2 will run in docker so I also run portainer
to manage them.
Overview#
Use Samba to share storage, and use PhotoSync to upload photoes from iPhone
to NAS. Use smartctl to check the disk condition, if anything need attention
send a mail to me.
File share (Samba)#
Install Samba by the following:
1
|
sudo apt-get install samba smbfs
|
Configure samba settings by opening /etc/samba/smb.conf,
If needed, change your workgroup
1
2
|
# Change this to the workgroup/NT-domain name your Samba server will part of
   workgroup = WORKGROUP
|
Next is to set your share folder, input something like this at the end of the
file.
1
2
3
4
5
6
7
|
[share]
   comment = Share directory for my self-nas
   path = /share
   read only = no
   guest only = no
   guest ok = no
   share modes = yes
|
Restart smbd service and confirm the service is running.
 1
 2
 3
 4
 5
 6
 7
 8
 9
10
11
12
13
14
15
16
17
18
19
|
wshi@nuc:~$ sudo systemctl restart smbd
wshi@nuc:~$ sudo systemctl status smbd
● smbd.service - Samba SMB Daemon
   Loaded: loaded (/lib/systemd/system/smbd.service; enabled; vendor preset: enabled)
   Active: active (running) since Fri 2020-04-10 15:58:55 JST; 3s ago
     Docs: man:smbd(8)
           man:samba(7)
           man:smb.conf(5)
 Main PID: 7696 (smbd)
   Status: "smbd: ready to serve connections..."
    Tasks: 4 (limit: 4915)
   CGroup: /system.slice/smbd.service
           ├─7696 /usr/sbin/smbd --foreground --no-process-group
           ├─7712 /usr/sbin/smbd --foreground --no-process-group
           ├─7713 /usr/sbin/smbd --foreground --no-process-group
           └─7722 /usr/sbin/smbd --foreground --no-process-group

Apr 10 15:58:55 nuc systemd[1]: Starting Samba SMB Daemon...
Apr 10 15:58:55 nuc systemd[1]: Started Samba SMB Daemon.
|
Set the password of the user which you want to use to access the samba server.
You can use this command again if you forgot the password.
1
|
wshi@nuc:~$ sudo smbpasswd -a wshi
|
Finially, create the share folder and set the right permissions 0777
1
2
|
$ sudo mkdir /share
$ sudo chmod 0777 /share
|
Disk Check - SMART#
The NAS system will be 24x7 running so we need some script to monitor its
health. SMART is a good tool for monitoring HDD,SSD and eMMC drives.
Installation#
1
|
$ sudo apt-get install smartmontools
|
Confirm SMART status#
Scan hard disk,
1
2
3
4
|
$ sudo smartctl --scan
/dev/sda -d scsi # /dev/sda, SCSI device
/dev/sdb -d sat # /dev/sdb [SAT], ATA device
/dev/nvme0 -d nvme # /dev/nvme0, NVMe device
|
Ensure the hard disk support SMART and is enable
 1
 2
 3
 4
 5
 6
 7
 8
 9
10
11
12
13
14
15
16
17
18
|
$ sudo smartctl -i /dev/sda
smartctl 7.1 2019-12-30 r5022 [x86_64-linux-5.4.0-25-generic] (local build)
Copyright (C) 2002-19, Bruce Allen, Christian Franke, www.smartmontools.org

=== START OF INFORMATION SECTION ===
Model Family:     Western Digital Green
Device Model:     WDC WD20EARX-00PASB0
Serial Number:    WD-WCAZAE607205
LU WWN Device Id: 5 0014ee 20713dc7e
Firmware Version: 51.0AB51
User Capacity:    2,000,398,934,016 bytes [2.00 TB]
Sector Sizes:     512 bytes logical, 4096 bytes physical
Device is:        In smartctl database [for details use: -P show]
ATA Version is:   ATA8-ACS (minor revision not indicated)
SATA Version is:  SATA 3.0, 6.0 Gb/s (current: 6.0 Gb/s)
Local Time is:    Tue Apr 21 10:58:05 2020 JST
SMART support is: Available - device has SMART capability.
SMART support is: Enabled
|
The last 2 lines show whether SMART support is available and enabled.
Show SMART infomation#
 1
 2
 3
 4
 5
 6
 7
 8
 9
10
11
12
13
14
15
16
17
18
19
20
21
22
23
24
25
|
$ sudo smartctl -A /dev/sda
smartctl 7.1 2019-12-30 r5022 [x86_64-linux-5.4.0-25-generic] (local build)
Copyright (C) 2002-19, Bruce Allen, Christian Franke, www.smartmontools.org

=== START OF READ SMART DATA SECTION ===
SMART Attributes Data Structure revision number: 16
Vendor Specific SMART Attributes with Thresholds:
ID# ATTRIBUTE_NAME          FLAG     VALUE WORST THRESH TYPE      UPDATED  WHEN_FAILED RAW_VALUE
  1 Raw_Read_Error_Rate     0x002f   200   200   051    Pre-fail  Always       -       1
  3 Spin_Up_Time            0x0027   165   157   021    Pre-fail  Always       -       6716
  4 Start_Stop_Count        0x0032   100   100   000    Old_age   Always       -       665
  5 Reallocated_Sector_Ct   0x0033   200   200   140    Pre-fail  Always       -       0
  7 Seek_Error_Rate         0x002e   200   200   000    Old_age   Always       -       0
  9 Power_On_Hours          0x0032   098   098   000    Old_age   Always       -       1946
 10 Spin_Retry_Count        0x0032   100   100   000    Old_age   Always       -       0
 11 Calibration_Retry_Count 0x0032   100   100   000    Old_age   Always       -       0
 12 Power_Cycle_Count       0x0032   100   100   000    Old_age   Always       -       616
192 Power-Off_Retract_Count 0x0032   200   200   000    Old_age   Always       -       39
193 Load_Cycle_Count        0x0032   196   196   000    Old_age   Always       -       13842
194 Temperature_Celsius     0x0022   127   099   000    Old_age   Always       -       23
196 Reallocated_Event_Count 0x0032   200   200   000    Old_age   Always       -       0
197 Current_Pending_Sector  0x0032   200   200   000    Old_age   Always       -       0
198 Offline_Uncorrectable   0x0030   200   200   000    Old_age   Offline      -       0
199 UDMA_CRC_Error_Count    0x0032   200   200   000    Old_age   Always       -       0
200 Multi_Zone_Error_Rate   0x0008   200   200   000    Old_age   Offline      -       0
|
Available Tests for the disk(SCSI)#
There are 2 types of tests:
Short Test#
This test is the rapid identification of a defective hard drive.
There fore, a maximum run time is 2 min. This test checks the disk by
dividing it into 3 different segments. The following areas are tested.
- Electrical Properties: The controller tests its own electronics, and since this is specific to each manufacturer, it cannot be explained exactly what is being tested. It is conceivable, for example, to test the internal RAM, the read/write circuits or the head electronics.
- Mechanical Properties: The exact sequence of the servos and the positioning mechanism to be tested is also specific to each manufacturer.
- Read/Verify: It will read a certain area of the disk and verify certain data, the size and position of the region that is read is also specific to each manufacturer.
Long Test#
This test is designed as the final test in production. There is no time restriction and the entire disk is checked and not just a section.
There are also other test which only available for ATA hard drive.
Conveyance Test and Select Test.
Before performing a test, you can use following command to show the time
duration of the various tests
1
|
$ sudo smartctl -c /dev/sdc
|
Example output
1
2
3
4
5
6
7
8
|
...
Short self-test routine
recommended polling time:        (   2) minutes.
Extended self-test routine
recommended polling time:        ( 353) minutes.
Conveyance self-test routine
recommended polling time:        (   5) minutes.
...
|
The following command starts the desired test (in Background Mode)
1
|
$ sudo smartctl -t <short|long|conveyance|select> /dev/sda
|
For example,
 1
 2
 3
 4
 5
 6
 7
 8
 9
10
11
|
$ sudo smartctl -t short /dev/sda
smartctl 7.1 2019-12-30 r5022 [x86_64-linux-5.4.0-25-generic] (local build)
Copyright (C) 2002-19, Bruce Allen, Christian Franke, www.smartmontools.org

=== START OF OFFLINE IMMEDIATE AND SELF-TEST SECTION ===
Sending command: "Execute SMART Short self-test routine immediately in off-line mode".
Drive command "Execute SMART Short self-test routine immediately in off-line mode" successful.
Testing has begun.
Please wait 2 minutes for test to complete.
Test will complete after Tue Apr 21 11:25:01 2020 JST
Use smartctl -X to abort test.
|
The test will run in background and the priority of the test is low, which means
the normal instructions continue to be processed by the hard disk. If the hard
drive is busy, the test is paused and then continues at a lower load speed, so
there is no interruption of the operation.
There is another Foreground mode which all commands will be answered during
the test with a “CHECK CONDITION” status. Therefore, this mode is only
recommended when the hard disk is not used. In principle, the background mode
is the preferred mode.
To perform the tests in Foreground Mode a -C must be added to the command.
1
|
$ sudo smartctl -t short -C /dev/sda
|
Verify the test result#
The test results are included in the output of the following:
1
|
$ sudo smartctl -a /dev/sda
|
Example output
1
2
3
4
5
|
...
SMART Self-test log structure revision number 1
Num  Test_Description    Status                  Remaining  LifeTime(hours)  LBA_of_first_error
# 1  Short offline       Completed without error       00%      1946         -
...
|
Or use the following, if only the test results should are displayed:
1
2
3
4
5
6
7
8
|
$ sudo smartctl -l selftest /dev/sda
smartctl 7.1 2019-12-30 r5022 [x86_64-linux-5.4.0-25-generic] (local build)
Copyright (C) 2002-19, Bruce Allen, Christian Franke, www.smartmontools.org

=== START OF READ SMART DATA SECTION ===
SMART Self-test log structure revision number 1
Num  Test_Description    Status                  Remaining  LifeTime(hours)  LBA_of_first_error
# 1  Short offline       Completed without error       00%      1946         -
|
Force stop the test#
Use -X if you want to stop the test when performing.
1
2
3
4
5
6
7
|
$ sudo smartctl -X /dev/sda
smartctl 7.1 2019-12-30 r5022 [x86_64-linux-5.4.0-25-generic] (local build)
Copyright (C) 2002-19, Bruce Allen, Christian Franke, www.smartmontools.org

=== START OF OFFLINE IMMEDIATE AND SELF-TEST SECTION ===
Sending command: "Abort SMART off-line mode self-test routine".
Self-testing aborted!
|
We can use this tool to check the disk status and send us email if anything
need our attention.
refer#
[https://mekou.com/linux-magazine/smartctl-%E3%82%B3%E3%83%9E%E3%83%B3%E3%83%89%E3%81%A7%E3%83%87%E3%82%A3%E3%82%B9%E3%82%AF%E6%B4%BB%E5%8B%95%E3%81%AE%E8%A9%B3%E7%B4%B0%E6%83%85%E5%A0%B1%E3%82%92%E5%8F%8E%E9%9B%86/](smartctl コマンドでディスク活動の詳細情報を収集)
[https://www.thomas-krenn.com/en/wiki/SMART_tests_with_smartctl#ATA.2FSCSI_Tests](SMART tests with smartctl)
Mail - sendEmail(CLI)#
The NAS system will be 24x7 running so we need some script to monitor its
health. If anything is not good it’s necessary to inform me by sending a mail.
SendEmail is a lightweight, completely command line-based SMTP email delivery
program. If you have the need to send email from a command prompt this tool is
perfect.
Install SendEmail by following command
1
|
$ sudo apt install sendemail
|
OK, let’s send a test mail by it.
1
2
3
4
5
6
7
8
9
|
$ sendEmail -f <FROM ADDRESS>@gmail.com \
            -s smtp.gmail.com:587 \
            -xu <USERNAME> \
            -xp <PASSWORD> \
            -t <TO ADDRESS>@gmail.com  \
            -u "test title" \
            -m "test contents"
Apr 06 14:33:24 nuc sendEmail[24438]: NOTICE => Authentication not supported by the remote SMTP server!
Apr 06 14:33:25 nuc sendEmail[24438]: ERROR => Received: 	530 5.7.0 Must issue a STARTTLS command first. mm18sm11195078pjb.39 - gsmtp
|
Oops, it failed with unsupported error. And looks related to tls.
Let’s specify the tls supported and re-run the command.
1
2
3
4
5
6
7
8
9
|
$ sendEmail -f <FROM ADDRESS>@gmail.com \
            -s smtp.gmail.com:587 \
            -xu <USERNAME> \
            -xp <PASSWORD> \
            -t <TO ADDRESS>@gmail.com  \
            -u "test title" \
            -m "test contents" \
            -o tls=yes
Apr 06 15:16:10 nuc sendEmail[25354]: ERROR => No TLS support!  SendEmail can't load required libraries. (try installing Net::SSLeay and IO::Socket::SSL)
|
We got a different message, and the root cause is we need more libraries. There
are 2 packages we need to install.
1
2
|
$ sudo apt-get install libnet-ssleay-perl
$ sudo apt-get install libio-socket-ssl-perl
|
Re-run the command and we can send email from CLI. :-)
1
|
Apr 06 15:17:28 nuc sendEmail[25507]: Email was sent successfully!
|
docker management - portainer#
There are a lot of docker image for a better NAS life, so let’s install and
setup Portainer first.
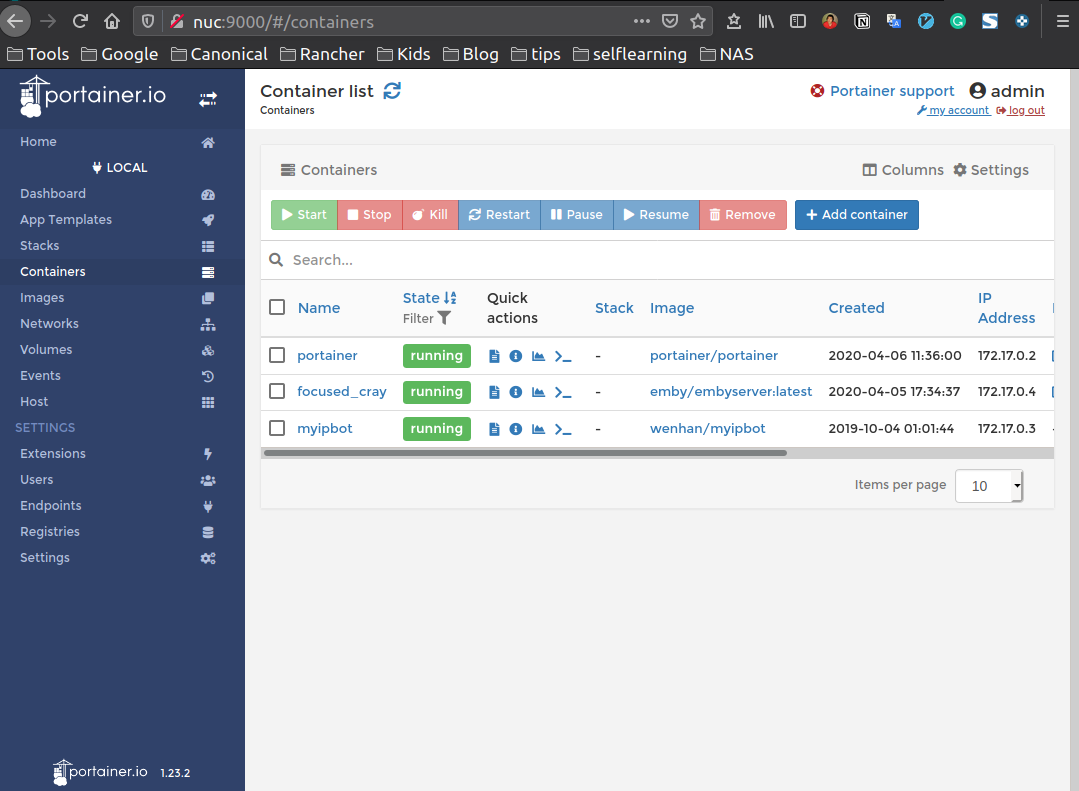
Portainer gives you a detailed overview of your Docker environments and allows
you to manage your containers, images, networks and volumes.
Install protainer is easy as it can be deployed as a container. Use the
following command to deploy the Portainer Server.
1
2
|
$ docker volume create portainer_data
$ docker run -d -p 8000:8000 -p 9000:9000 --name=portainer --restart=always -v /var/run/docker.sock:/var/run/docker.sock -v portainer_data:/data portainer/portainer
|
Please note the -v /var/run/docker.sock:/var/run/docker.sock works in Linux
environment only.
If your container runs successfully, You can now login to https://<SERVER IP ADDR>:9000/ to access the protainer dashboard. First it will ask you a new
password for admin user. Connect your local docker engine environment and you
can see something as follows.
Emby is a media server designed to organize, play, and stream audio and video
to a variety of devices.
The install is very easy, you can start a container to run Emby server. There
is a Installation Guide on 
First pull the latest image
1
|
docker pull emby/embyserver:latest
|
Then just launch a new container using the following command
 1
 2
 3
 4
 5
 6
 7
 8
 9
10
11
12
|
docker run -d \
    --volume /path/to/programdata:/config \ # This is mandatory
    --volume /path/to/share1:/mnt/share1 \ # To mount a first share
    --volume /path/to/share2:/mnt/share2 \ # To mount a second share
    --device /dev/dri:/dev/dri \ # To mount all render nodes for VAAPI/NVDEC/NVENC
    --runtime=nvidia \ # To expose your NVIDIA GPU
    --publish 8096:8096 \ # To expose the HTTP port
    --publish 8920:8920 \ # To expose the HTTPS port
    --env UID=1000 \ # The UID to run emby as (default: 2)
    --env GID=100 \ # The GID to run emby as (default 2)
    --env GIDLIST=100 \ # A comma-separated list of additional GIDs to run emby as (default: 2)
    emby/embyserver:latest
|
Above one is from the offical guide, but you don’t need to set all the options.
Some of the options are not necessary to change, if you ignore it the default
setting will work. Let me paste the command works for me.
1
2
3
4
5
|
$ sudo docker run -d  --volume /share/movie:/mnt/share1 \
                      --publish 8096:8096  \
                      --env UID=`id -u` \
                      --env GID=`id -g` \
                      emby/embyserver:latest
|
If your container runs successfully, You can now login to https://<SERVER IP ADDR>:8096/ to access the Emby site, and follow the guide to set your
environment.
There is one important setting about the subtitles, you need to create a new
account at https://www.opensubtitles.org/, and set your username/password in
Emby. Then you should download subtitle in Emby, this is super helpful.
Web control pannel - webmin#
Webmin is a web-based interface for system administration for Unix. Using any
modern web browser, you can setup user accounts, Apache, DNS, file sharing and
much more. Webmin removes the need to manually edit Unix configuration files
like /etc/passwd, and lets you manage a system from the console or remotely.
See the standard modules page for a list of all the functions built into
Webmin.
The install of webmin is easy. First need to import the webmin GPG key and the
apt-repository. Then you can just install webmin via apt command.
1
2
3
|
$ wget -q http://www.webmin.com/jcameron-key.asc -O- | sudo apt-key add -
$ sudo add-apt-repository "deb [arch=amd64] http://download.webmin.com/download/repository sarge contrib"
$ sudo apt install webmin
|
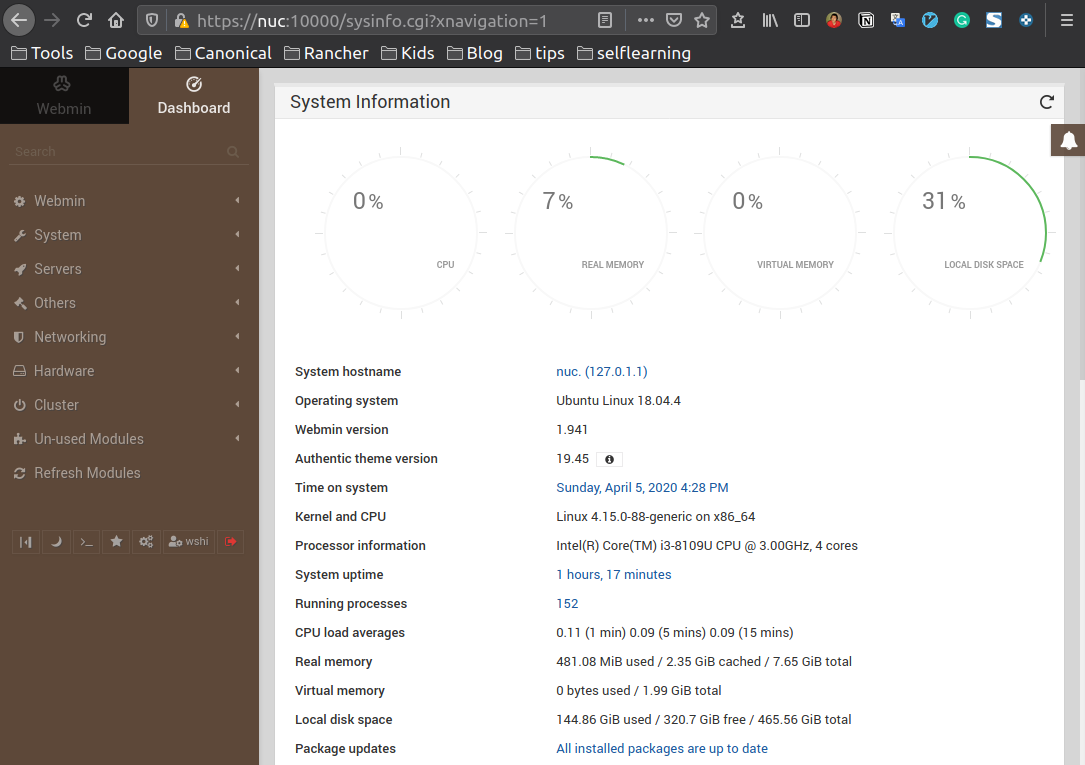
After the install, a message will be displayed as follows. Access the URL with
the username and password in the host machine to login to the webUI.
1
2
3
|
Webmin install complete. You can now login to https://<SERVER IP ADDR>:10000/
as root with your root password, or as any user who can use sudo
to run commands as root.
|
The dashboard is like this
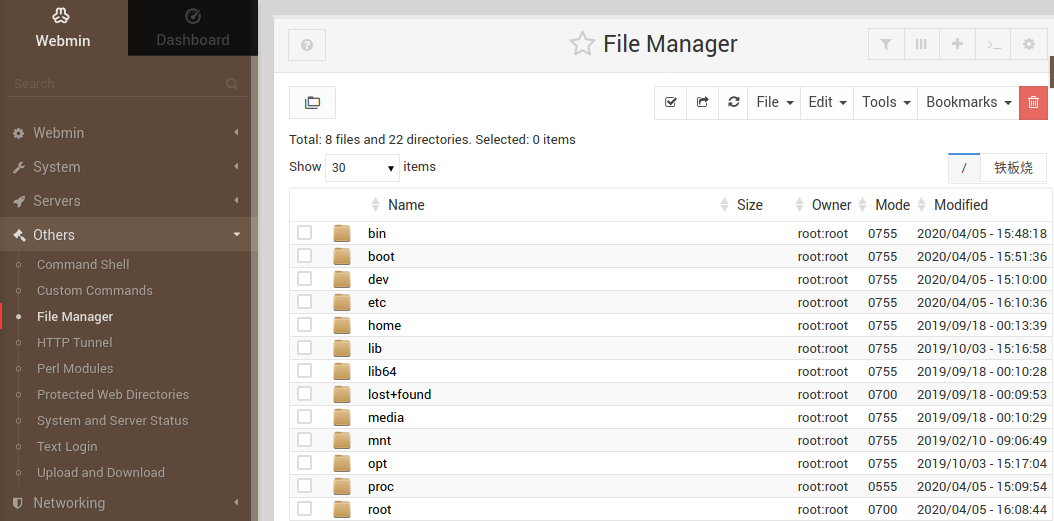
Then you can check or modify contents/settings on the host machine.
For example, to check the files, click Others->FIle Manager.
If your system is behind a UFW firewall, you may need to open the 10000 port
which is used by default to listen connections.
To alow traffic on port 10000 run the following command.
1
|
$ sudo ufw allow 10000/tcp
|
Refers to
https://www.digitalocean.com/community/tutorials/how-to-install-webmin-on-ubuntu-18-04
https://linuxize.com/post/how-to-install-webmin-on-ubuntu-18-04/