こちらの記事はではAnsibleを紹介するための文章で、元Red Hat社員のJingjing Shiが作成し、Wenhan Shiが日本語に翻訳しました。内容の校正はHideki SaitoとKento Yagisawaが協力しています。Ansibleの基礎知識から、実際の現場で利用できる実運用まで紹介しています。
本文内にあるすべてのansible playbookの例は、以下のgithubのURLから利用できる。
https://github.com/ansible-book/ansible-first-book-examples
もし不備やコメントがありましたら、作者[email protected]または翻訳者[email protected] に連絡してください。
詳細の内容を下記三つに分けて説明します。
Ansible 入門 - 紹介
Ansible 入門 - 基本
Ansible 入門 - 応用
本章では、もっと自由に運用するために、Ansibleの高度な使い方を説明する。
- Ansibleの設定ファイル
- サーバーリスト管理(Host Inventory)
- Playbookの上級な書き方
- Extraモジュールの利用
Ansible設定ファイル
設定内容
| 項目 |
詳細 |
内容(デフォルト) |
| inventory |
リモートノードリスト管理ファイル |
/etc/ansible/hosts |
| library |
拡張モジュールフォルダ |
/usr/share/my_modules/ |
| remote_tmp |
リモートノード上のファイル一時保存場所 |
$HOME/.ansible/tmp |
| local_tmp |
管理者ノード上のファイル一時保存場所 |
$HOME/.ansible/tmp |
| 項目 |
詳細 |
内容(デフォルト) |
| accelerate_port |
接続ポート番号 |
5099 |
| accelerate_timeout |
タイムアウト |
30 |
| accelerate_connect_timeout |
接続タイムアウト |
5 |
上記は設定できる内容の一部しかすぎない。以下のAnsible設定ファイルの全体を通して、どんなことができるのはは理解できる
https://raw.githubusercontent.com/ansible/ansible/devel/examples/ansible.cfg
設定ファイル内のキーワードについて不明な点があった場合、下記のURLから詳細を参照できる。
http://docs.ansible.com/ansible/intro_configuration.html#explanation-of-values-by-section
優先順位
設定ファイルのデフォルトのパスは/etc/ansible/ansible.cfg。Ansibleは以下の順番で設定ファイルを検索し、最初に見つけたファイルの設定内容を読み込む。
- ANSIBLE_CONFIG (an environment variable)
- ansible.cfg (in the current directory)
- .ansible.cfg (in the home directory)
- /etc/ansible/ansible.cfg
Ansible 1.5以前の順番は
- ansible.cfg (in the current directory)
- ANSIBLE_CONFIG (an environment variable)
- .ansible.cfg (in the home directory)
- /etc/ansible/ansible.cfg
Host Inventory(サーバーリスト)
サーバーリストとは、管理対象のリモートノード情報と、カテゴリやグループなどの情報をAnsibleに教えるためのファイルである。カテゴリは自分のニーズ、ロケーション、役割などによって分類できる。
ファイルパス
デフォルトのファイルパス
/etc/ansible/hosts
ファイルパスの変更
/etc/ansible/ansible.cfg の以下の部分を変更
1
2
3
|
...
inventory      = /etc/ansible/hosts
...
|
コマンドライン上で指定
1
|
ansible-playbook -i hosts site.yml
|
或者参数–inventory-file
1
|
ansible-playbook --inventory-file hosts site.yml
|
サーバーのカテゴリ化
[]内でグループ名を書く
 1
 2
 3
 4
 5
 6
 7
 8
 9
10
11
12
13
14
15
16
|
mail.example.com

[webservers]
foo.example.com
bar.example.com

[dbservers]
one.example.com
two.example.com
three.example.com

[webservers]
www[01:50].example.com

[databases]
db-[a:f].example.com
|
グループは子グループを持つこともできる。以下の例では、southeaseグループは[usa:children]の子グループであり、atlantaとreleighは[southease:children]の子グループである。
 1
 2
 3
 4
 5
 6
 7
 8
 9
10
11
12
13
14
15
16
17
|
[atlanta]
host1
host2

[raleigh]
host2
host3

[southeast:children]
atlanta
raleigh

[usa:children]
southeast
northeast
southwest
northwest
|
接続パラメータと変数
パラメータ
リモートノードに接続する方法とユーザを、パラメータに設定できる。
1
2
3
4
5
6
7
8
9
|
[targets]

localhost              ansible_connection=local
other1.example.com     ansible_connection=ssh        ansible_user=mpdehaan
other2.example.com     ansible_connection=ssh        ansible_user=mdehaan

[atlanta]
host1 http_port=80 maxRequestsPerChild=808
host2 http_port=303 maxRequestsPerChild=909
|
指定可能なパラメータの一覧は以下を参照する。
http://docs.ansible.com/ansible/intro_inventory.html#list-of-behavioral-inventory-parameters
変数
グループに対して変数を設定することができる。
1
2
3
4
5
6
7
|
[atlanta]
host1
host2

[atlanta:vars]
ntp_server=ntp.atlanta.example.com
proxy=proxy.atlanta.example.com
|
ディレクトリ構造での変数保存
例えば、inventoryファイルは/etc/ansible/hostsの場合、関連するhostsとgroup変数は以下のディレクトリに保存できる。
1
2
3
|
/etc/ansible/group_vars/raleigh # can optionally end in '.yml', '.yaml', or '.json'
/etc/ansible/group_vars/webservers
/etc/ansible/host_vars/foosball
|
/etc/ansible/group_vars/raleigh ファイルの内容は
1
2
3
|
---
ntp_server: acme.example.org
database_server: storage.example.org
|
もし対応する名前はディレクトリ名の場合、Ansibleはこのディレクトリ以下のすべてのファイルの内容を読み込む。
1
2
|
/etc/ansible/group_vars/raleigh/db_settings
/etc/ansible/group_vars/raleigh/cluster_settings
|
group_vars/とhost_vars/ はinventory/以下またはplaybook/以下に置くことができる。もし両方(inventory/またはplaybook/)の下にファイルがある場合、playbook以下の配置はinventoryより優先的に読み込まれる。
Ansibleのスクリプト(Playbook)
フォーマット
AnsibleのスクリプトはYAML形式を利用している。Playbookを書く前に既存のPlaybookを参考したほうが効率良く作成することができる効率。
オフィシャルの例
Ansibleの公式Githubリポジトリに存在するテスト済みのPlaybookをシェアしている。
https://github.com/ansible/ansible-examples
他のユーザがシェアしたPlaybook
「Ansible Galaxy」というPlaybookをシェアするためのサイトがある。このサイトにある例はユーザが自分でアップロードしたもので、Playbookの勉強や参考にするとは良いが、実際に利用する前には必ずテストが必要である。
https://galaxy.ansible.com/
Playbookの基本
本節ではPlaybookを書くための基本を説明する。
Playbookの実行
1
|
ansible-playbook deploy.yml
|
詳細な実行ログを出力
1
|
ansible-playbook playbook.yml --verbose
|
影響するリモートノードの一覧
1
|
ansible-playbook playbook.yml --list-hosts
|
スクリプトを並行に実行する
1
|
ansible-playbook playbook.yml -f 10
|
簡単なPlaybookの例
基本のplaybookのスクリプトの例では、以下三つの部分がある。
- どのサーバー上にどのユーザで実行
- hosts
- users
- 実行するタスク
- tasks
- イベントハンドル
- handles
deploy.yml
 1
 2
 3
 4
 5
 6
 7
 8
 9
10
11
12
13
14
15
16
17
18
|
---
- hosts: webservers
  vars:
    http_port: 80
    max_clients: 200
  user: root
  tasks:
  - name: ensure apache is at the latest version
    yum: pkg=httpd state=latest
  - name: write the apache config file
    template: src=/srv/httpd.j2 dest=/etc/httpd.conf
    notify:
    - restart apache
  - name: ensure apache is running
    service: name=httpd state=started
  handlers:
    - name: restart apache
      service: name=httpd state=restarted
|
対象サーバと実行ユーザ(hostsとuser)
| key |
意味 |
| hosts |
リモートサーバーのIPアドレス、ホスト名、グループ名。またはallキーワードですべてのリモートノードを指定 |
| user |
リモートサーバー上で実行するユーザ名 |
| become |
他のユーザに切り替えて実行する、値は yes または no |
| become_method |
becomeと一緒に利用、‘sudo’ / ’su’ / ’pbrun’ / ’pfexec’ / ’doas’などを指定 |
| become_user |
becomeと一緒に利用、rootまたは他のユーザ名 |
スクリプト上でbecomeを利用する時、–ask-become-passを追加することで、playbook実行後にsudoパスワードを入力することが要求される。
1
|
ansible-playbook deploy.yml --ask-become-pass
|
実行するタスク(Tasks)
- タスクはPlaybookの上から下まで実行する。途中でエラーが発生した場合、Playbookの実行が中止される。スクリプトファイルを修正した後、再度スクリプトを実行する。
- 各taskはモジュールの読み出しであり、パラメータと変数を適切に設定する。
- 各taskはname 属性を持ったほうが、人間にとって理解しやすくなる。name属性は内容を出力するだけで、実行の進捗をユーザに提示することができる。
構文
Tasksの基本構文を以下に示す。
1
2
3
|
tasks:
  - name: make sure apache is running
    service: name=httpd state=running
|
name変数は必須ではないので、上記の例を下記のように記載することもできる。
1
2
|
tasks:
  - service: name=httpd state=running
|
name変数が書かれた場合、Playbookがこのタスクを実行する時に、name変数の内容が出力されスクリプトの進捗が分かりやすくなる。
1
2
|
TASK: [make sure apache is running] *************************************************************
changed: [yourhost]
|
Name変数が書かれていない場合、taskのモジュール実行の構文がそのまま出力される。複数のモジュールが使われている場合、スクリプトの進捗が分からなくなる。
1
2
|
TASK: [service name=httpd state=running] **************************************
changed: [yourhost]
|
変数の渡し方
上記の構文の例では、モジュールに変数を渡す方法を示している:key=value
1
2
3
|
tasks:
  - name: make sure apache is running
    service: name=httpd state=running
|
変数が多い場合、改行して複数行に書くこともできる。
1
2
3
4
|
tasks:
  - name: Copy ansible inventory file to client
    copy: src=/etc/ansible/hosts dest=/etc/ansible/hosts
            owner=root group=root mode=0644
|
またはYAMLのハッシュ形式でパラメータを入力する。
1
2
3
4
5
6
7
8
|
tasks:
  - name: Copy ansible inventory file to client
    copy:
      src: /etc/ansible/hosts
      dest: /etc/ansible/hosts
      owner: root
      group: root
      mode: 0644
|
実行状態
タスク内の各actionは一つのモジュールを実行し、最初にリモートノードの状態を確認し、実行が必要かどうかを判断する。
- モジュールが実行された場合、モジュールからactionへの戻り値は changed になる。
- 実行が必要ないと判断した時、モジュールからactionへの戻り値は OK になる。
実行必要性の判断は各モジュール内で決めている。例えば、copy モジュールの判断方式は、ファイルのchecksum値を比較する。copyモジュールのコードを以下に示す。
https://github.com/ansible/ansible-modules-core/blob/devel/files/copy.py
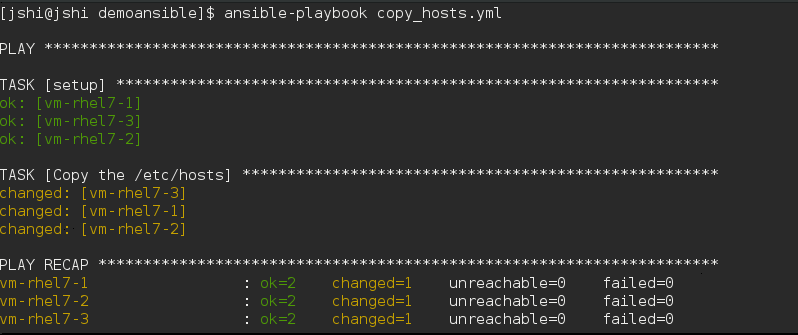
以下のように、copyモジュールを例にする
1
2
3
|
 tasks:
  - name: Copy the /etc/hosts
    copy: src=/etc/hosts dest=/etc/hosts
|
最初に実行する時に、TASKの状態がchangedになっている。
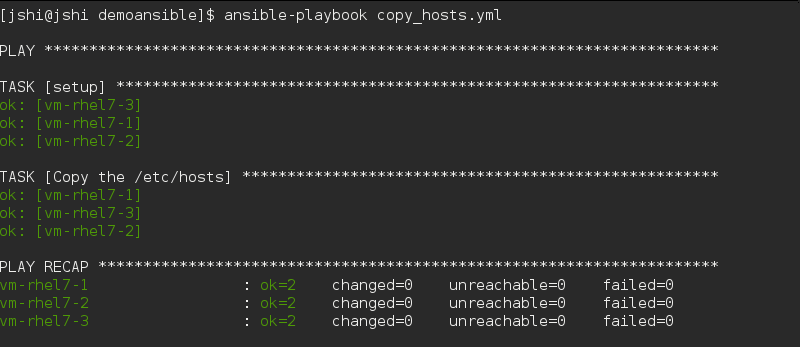
2回目実行すると、コピー元とコピー先のファイルが同じのめ、コピー作業が必要ないと判断し実行されていない。TASKの状態がOKになっている。
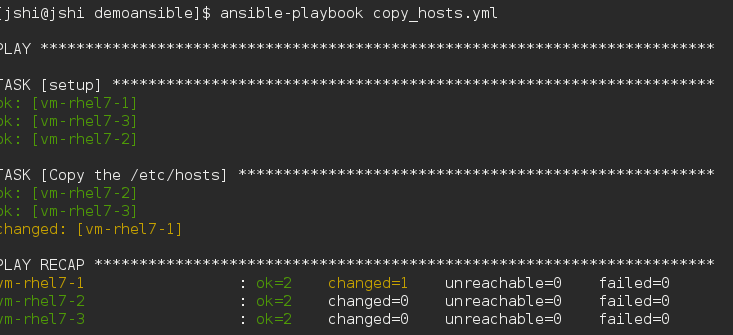
リモートノードvm-rhel7-1上の/etc/hostsファイルを変更した後、もう一度実行すると、vm-rhel7-1のみファイルがコピーされ、TASKの状態がchangedになる。
イベントハンドラ(handler)
定義
一般的なプログラミング言語にevent処理があるように、handleとはplaybookスクリプトでのevent処理である。
tasksと似ていて、Handlers内の各handlerはモジュールを一回実行している。ただ、tasksと異なっている部分は、tasksは書かれた順によって実行されるが、handlersはtasks内に呼び出す(notify)時のみ実行される。
また、tasksが実行された後、changedまたはOKの状態になっていて、handlerはtasks実行後状態がchangedの時のみ実行される。
役割
もしtasksの中にapachの設定ファイルを変更した後、apacheを再起動する必要がある。そのほかにapache のプラグインをインストールした後にも、apacheを再起動する必要がある。この場合、「apacheを再起動する」ことは、handlerとして実行することができる。
handlerは全てのタスクが実行した後に実行する。複数のtasksに呼び出されても、handlerは一回のみ実行する。以下の例では、handlerは一回のみ実行される。
https://github.com/ansible-book/ansible-first-book-examples/blob/master/handlers_state.yml
 1
 2
 3
 4
 5
 6
 7
 8
 9
10
11
12
13
14
15
16
17
18
19
|
---
- hosts: lb
  remote_user: root
  vars:
      random_number1: "\{\{ 10000 | random \}\}"
      random_number2: "\{\{ 10000000000 | random \}\}"
  tasks:
  - name: Copy the /etc/hosts to /tmp/hosts.\{\{ random_number1 \}\}
    copy: src=/etc/hosts dest=/tmp/hosts.\{\{ random_number1 \}\}
    notify:
      - call in every action
  - name: Copy the /etc/hosts to /tmp/hosts.\{\{ random_number2 \}\}
    copy: src=/etc/hosts dest=/tmp/hosts.\{\{ random_number2 \}\}
    notify:
      - call in every action

  handlers:
  - name: call in every action
    debug: msg="call in every action, but execute only one time"
|
tasksのactionの実行状態がchangedの場合のみ、handlerが呼び出されて(notify)実行される。下記のスクリプトが2回実行された時、実行結果が異る。
- 1回目実行の時、tasksの状態が両方changedのため、二つのhandlerが実行される。
- 2回目実行の時、
- 1つ目のtaskの状態がOKのため、”call by /tmp/hosts”handlerが実行されない。
- 2つ目のtaskの状態がchangedのため、”call by /tmp/hosts.random_number” handlerが実行される
テストのコードを以下を参照する。
https://github.com/shijingjing1221/ansible-first-book-examples/blob/master/handlers_execution_time.yml
 1
 2
 3
 4
 5
 6
 7
 8
 9
10
11
12
13
14
15
16
17
18
19
20
|
---
- hosts: lb
  remote_user: root
  vars:
      random_number: "\{\{ 10000 | random \}\}"
  tasks:
  - name: Copy the /etc/hosts to /tmp/hosts
    copy: src=/etc/hosts dest=/tmp/hosts
    notify:
      - call by /tmp/hosts
  - name: Copy the /etc/hosts to /tmp/hosts.\{\{ random_number \}\}
    copy: src=/etc/hosts dest=/tmp/hosts.\{\{ random_number \}\}
    notify:
      - call by /tmp/hosts.random_number

  handlers:
  - name: call by /tmp/hosts
    debug: msg="call first time"
  - name: call by /tmp/hosts.random_number
    debug: msg="call by /tmp/hosts.random_number"
|
handlersはnotifyされる順番ではなく、定義された順番で実行される。下記の例では、定義の順番が1>2>3であり、notifyの順番が3>2>1であっても、実際の実行順番が1>2>3になる。
 1
 2
 3
 4
 5
 6
 7
 8
 9
10
11
12
13
14
15
16
17
18
19
20
21
22
23
24
25
|
---
- hosts: lb
  remote_user: root
  gather_facts: no
  vars:
      random_number1: "\{\{ 10000 | random \}\}"
      random_number2: "\{\{ 10000000000 | random \}\}"
  tasks:
  - name: Copy the /etc/hosts to /tmp/hosts.\{\{ random_number1 \}\}
    copy: src=/etc/hosts dest=/tmp/hosts.\{\{ random_number1 \}\}
    notify:
      - define the 3nd handler
  - name: Copy the /etc/hosts to /tmp/hosts.\{\{ random_number2 \}\}
    copy: src=/etc/hosts dest=/tmp/hosts.\{\{ random_number2 \}\}
    notify:
      - define the 2nd handler
      - define the 1nd handler

  handlers:
  - name: define the 1nd handler
    debug: msg="define the 1nd handler"
  - name: define the 2nd handler
    debug: msg="define the 2nd handler"
  - name: define the 3nd handler
    debug: msg="define the 3nd handler"
|
Playbookで利用可能な変数
本節では、よく使う幾つかの変数を紹介する。次の章からは、複雑な場面での変数の使い方などを紹介する。
一般的に、Playbookで利用できる変数は以下になる。
- Playbook中ユーザが定義する変数
- ユーザが定義する必要がなく, AnsibleがPlaybookを実行する前に収集したリモートノードのシステム情報として使える変数
- テンプレートでは上記 2つ種類の変数が直接利用できる。
- taskの実行結果を変数として使える。この変数はとなる
- Playbookをもっと汎用性高く、動的に使いやすくするために、ユーザが実行中に変数を入力することができる。この変数はとなる
Playbook中で定義した変数
ユーザはPlaybook中に、varsキーワードで変数を定義することができる。使用する時は\{\{\}\}で囲んで利用する。下記の例では、ユーザがhttp_port変数を定義し、80と設定している。tasks firewalldの中で、\{\{ http_port \}\}で内容を読み込んでいる。
1
2
3
4
5
6
7
8
|
---
- hosts: web
  vars:
    http_port: 80
  remote_user: root
  tasks:
  - name: insert firewalld rule for httpd
    firewalld: port=\{\{ http_port \}\}/tcp permanent=true state=enabled immediate=yes
|
変数を単独ファイルに置く
変数が多い時、または複数のPlaybook中に共用されたい時に、変数を単独の変数ファイルに置くことができる。var_filesパラメータに該当する変数ファイル名を設定すると、同じ使い方で変数を参照できる。
Playbook
1
2
3
4
5
6
7
|
- hosts: web
  remote_user: root
  vars_files:
      - vars/server_vars.yml
  tasks:
  - name: insert firewalld rule for httpd
    firewalld: port=\{\{ http_port \}\}/tcp permanent=true state=enabled immediate=yes
|
vars/server_vars.yml
複雑変数の扱い方
利用したい変数は簡単な文字列や数字ではなく、一つのオブジェクトにしたい時がある。その時に以下のようなYAMLのハッシュ形式(または辞書形式)にオブジェクトの内容を設定する。
1
2
3
|
foo:
  field1: one
  field2: two
|
こちらの変数を利用したい時は、中括弧またはピリオドで参照できる。
1
2
|
foo['field1']
foo.field1
|
YAMLの落とし穴
YAMLの変数構文がAnsibleの変数構文と一緒に書くと構文エラーになる場合がある。詳細については、コロン(:)の後ろにすぐ大括弧 { を書くことはできなく、かならずダブルクォーテーション “ で囲む必要がある。もしエラー内容が YAMLの構文エラーの場合、ダブルクォーテーション “ を追加して解決する。
このYAMLは構文エラーになる。
1
2
3
|
- hosts: app_servers
  vars:
      app_path: \{\{ base_path \}\}/22
|
解決方法は、変数の前後にダブルクォーテーションを追加する。
1
2
3
|
- hosts: app_servers
  vars:
       app_path: "\{\{ base_path \}\}/22"
|
システム変数(facts)
Ansibleはsetup モジュールを通じてリモートノードのシステム情報を収集している。こちらのシステム情報はfactsと呼び、直接変数として利用することができる。
コマンドラインからsetupモジュールを実行して利用可能な変数の一覧が確認できる。
1
|
ansible all -m setup -u root
|
Playbookの中では、facts変数を直接利用することができる。
 1
 2
 3
 4
 5
 6
 7
 8
 9
10
11
12
|
---
- hosts: all
  user: root
  tasks:
  - name: echo system
    shell: echo \{\{ ansible_os_family \}\}
  - name install ntp on Debian linux
    apt: name=git state=installed
    when: ansible_os_family == "Debian"
  - name install ntp on redhat linux
    yum: name=git state=present
    when: ansible_os_family == "RedHat"
|
複雑なfacts変数
一般変数と同じく、以下のようなハッシュ変数形式のfacts変数も存在する。
 1
 2
 3
 4
 5
 6
 7
 8
 9
10
11
12
13
14
15
16
17
18
19
20
21
22
23
24
25
26
27
28
|
...
        "ansible_ens3": {
            "active": true,
            "device": "ens3",
            "ipv4": {
                "address": "10.66.192.234",
                "netmask": "255.255.254.0",
                "network": "10.66.192.0"
            },
            "ipv6": [
                {
                    "address": "2620:52:0:42c0:5054:ff:fef2:e2a3",
                    "prefix": "64",
                    "scope": "global"
                },
                {
                    "address": "fe80::5054:ff:fef2:e2a3",
                    "prefix": "64",
                    "scope": "link"
                }
            ],
            "macaddress": "52:54:00:f2:e2:a3",
            "module": "8139cp",
            "mtu": 1500,
            "promisc": false,
            "type": "ether"
        },
...
|
以下の二つの方法でハッシュ形式のfacts変数の属性を参照する。
中括弧
1
|
\{\{ ansible_ens3["ipv4"]["address"] \}\}
|
ピリオド
1
|
\{\{ ansible_ens3.ipv4.address \}\}
|
factsの無効化
Playbookでは、gather_factsパラメータがfacts変数の収集を設定できる。下記のように no と設定すると、上記のfacts変数はこのPlaybookでの利用ができなくなる。
1
2
|
- hosts: whatever
  gather_facts: no
|
テンプレートで定義した変数
テンプレートはAnsibleでよく使われているため、テンプレートファイルでの変数の使い方を説明する。
変数の定義
Playbook内で定義した変数、factsシステム変数、inventory内で定義したhostとgroup変数は、直接テンプレートで利用できる。Playbook内で利用できる変数は、テンプレートファイルでも利用できる。
下記のPlaybookスクリプトではtemplate モジュールでindex.html.j2ファイルをコピーし、その中の変数をPlaybookで定義した変数の値に設定する。
 1
 2
 3
 4
 5
 6
 7
 8
 9
10
11
12
13
14
15
16
17
18
19
20
21
22
23
24
25
26
|
---
- hosts: web
  vars:
    http_port: 80
    defined_name: "Hello My name is Jingjng"
  remote_user: root
  tasks:
  - name: ensure apache is at the latest version
    yum: pkg=httpd state=latest

  - name: Write the configuration file
    template: src=templates/httpd.conf.j2 dest=/etc/httpd/conf/httpd.conf
    notify:
    - restart apache

  - name: Write the default index.html file
    template: src=templates/index2.html.j2 dest=/var/www/html/index.html

  - name: ensure apache is running
    service: name=httpd state=started
  - name: insert firewalld rule for httpd
    firewalld: port=\{\{ http_port \}\}/tcp permanent=true state=enabled immediate=yes

  handlers:
    - name: restart apache
      service: name=httpd state=restarted
|
変数の利用
Ansibleのテンプレートファイルが利用する構文はPython のテンプレート言語Jinja2。下記のテンプレートの例index.html.j2の中で、変数を直接利用している。
- システム変数
\{\{ ansible_hostname \}\}, \{\{ ansible_default_ipv4.address \}\}
- ユーザ定義した変数
\{\{ defined_name \}\}
Index.html.j2ファイルの内容
 1
 2
 3
 4
 5
 6
 7
 8
 9
10
11
|
<html>
<title>Demo</title>
<body>
<div class="block" style="height: 99%;">
    <div class="centered">
        <h1>#46 Demo \{\{ defined_name \}\}</h1>
        <p>Served by \{\{ ansible_hostname \}\} (\{\{ ansible_default_ipv4.address \}\}).</p>
    </div>
</div>
</body>
</html>
|
タスクの実行結果を変数に設定
taskの実行結果は変数の値に代入できる。この場合はregisterキーワードを利用し、taskの実行結果を変数に設定し、その後にあるactionに利用される。
 1
 2
 3
 4
 5
 6
 7
 8
 9
10
11
12
13
14
|
---

- hosts: web

  tasks:

     - shell: ls
       register: result
       ignore_errors: True

     - shell: echo "\{\{ result.stdout \}\}"
       when: result.rc == 5

     - debug: msg="\{\{ result.stdout \}\}"
|
Register変数はよくdebug モジュールと一緒に利用され、actionの実行の詳細情報を得てトラブルシュッティングに役立つ。
コマンドラインで変数を渡す
汎用性と便利性のため、コマンドラインでPlaybookに変数の値を渡すことができる。この場合はansible-playbookの–extra-varsオプションを利用する。
コマンドライン変数の定義
下記のように、release.ymlファイルでは、hostsとuserは変数として定義され、コマンドラインから値を設定する必要がある。
1
2
3
4
5
6
7
|
---

- hosts: '\{\{ hosts \}\}'
  remote_user: '\{\{ user \}\}'

  tasks:
     - ...
|
コマンドライン変数の利用
以下のようにコマンドラインから変数の値を設定する。
1
|
ansible-playbook e33_var_in_command.yml --extra-vars "hosts=web user=root"
|
そのほかに、JSON形式でも利用できる。
1
|
ansible-playbook e33_var_in_command.yml --extra-vars "{'hosts':'vm-rhel7-1', 'user':'root'}"
|
また、変数と値をJSONファイルに書いて、コマンドラインに渡すこともできる。
1
|
ansible-playbook e33_var_in_command.yml --extra-vars "@vars.json"
|
条件判断、ループとブロック
- when: 条件判断のキーワード。ifに似ている
- loop:循環処理(ループ)のキーワード。forに似ている
- block:複数のtasksを一つのブロックにまとめて、異常処理の対応などに利用できる。
条件判断(when)
例えば、特定のversionのシステム上にパッケージをインストールや、ディスク空き容量がない時にファイルを削除するなど、特定の条件に満足している時のみ、特定のtaskを実行したい場合、Playbook内のwhenを利用する。
サーバーがDebian Linuxの場合すぐシャットダウンする
1
2
3
4
|
tasks:
  - name: "shutdown Debian flavored systems"
    command: /sbin/shutdown -t now
    when: ansible_os_family == "Debian"
|
actionの実行結果によって、次に実行するactionを決める
 1
 2
 3
 4
 5
 6
 7
 8
 9
10
|
tasks:
  - command: /bin/false
    register: result
    ignore_errors: True
  - command: /bin/something
    when: result|failed
  - command: /bin/something_else
    when: result|success
  - command: /bin/still/something_else
    when: result|skipped
|
リモートノードのシステム変数factsも 条件としてwhenに判断されることができる。また、| intの書き方で返り値の型変換もできる。
1
2
3
4
5
|
---
- hosts: web
  tasks:
    - debug: msg="only on Red Hat 7, derivatives, and later"
      when: ansible_os_family == "RedHat" and ansible_lsb.major_release|int >= 6
|
条件式
真偽(True/False)判断の条件式
 1
 2
 3
 4
 5
 6
 7
 8
 9
10
|
vars:
  epic: true

tasks:
    - shell: echo "This certainly is epic!"
      when: epic

tasks:
    - shell: echo "This certainly isn’t epic!"
      when: not epic
|
定義有り無し判断の条件式
1
2
3
4
5
6
|
tasks:
    - shell: echo "I've got '\{\{ foo \}\}' and am not afraid to use it!"
      when: foo is defined

    - fail: msg="Bailing out. this play requires 'bar'"
      when: bar is not defined
|
数値に対する条件式
1
2
3
4
|
tasks:
    - command: echo \{\{ item \}\}
      with_items: [ 0, 2, 4, 6, 8, 10 ]
      when: item > 5
|
includeと一緒に利用
1
2
|
- include: tasks/sometasks.yml
  when: "'reticulating splines' in output"
|
Roleと一緒に利用
1
2
3
|
- hosts: webservers
  roles:
     - { role: debian_stock_config, when: ansible_os_family == 'Debian' }
|
循環処理(loop)
標準のループ(with_items)
コードの読み易さと簡潔のため、重複のタスク内容を以下のように書くことができる。
1
2
3
4
5
|
- name: add several users
  user: name=\{\{ item \}\} state=present groups=wheel
  with_items:
     - testuser1
     - testuser2
|
変数ファイルまたはPlaybookのvarsでYAMLリストを定義した場合、下記のように処理をループすることができる。
1
2
3
4
5
6
|
vars:
  somelist: ["testuser1", "testuser2"]
tasks:
  -name: add several user
   user: name=\{\{ item \}\} state=present groups=wheel
   with_items: "\{\{somelist\}\}"
|
with_itemsキーワードで操作できるのは簡単なデータだけではなく、ハッシュ型(辞書型)の変数の値もループできる。
1
2
3
4
5
|
- name: add several users
  user: name=\{\{ item.name \}\} state=present groups=\{\{ item.groups \}\}
  with_items:
    - { name: 'testuser1', groups: 'wheel' }
    - { name: 'testuser2', groups: 'root' }
|
注意:whenとwith_items(または他のループ)を同時に使用する場合、ループの各実行項目に対してwhenが条件判断を行う。
ネストループ(with_nested)
階層形式のデータもループすることができる。
1
2
3
4
5
|
- name: give users access to multiple databases
  mysql_user: name=\{\{ item[0] \}\} priv=\{\{ item[1] \}\}.*:ALL append_privs=yes password=foo
  with_nested:
    - [ 'alice', 'bob' ]
    - [ 'clientdb', 'employeedb', 'providerd']
|
または
1
2
3
4
5
|
- name: give users access to multiple databases
  mysql_user: name=\{\{ item.0 \}\} priv=\{\{ item.1 \}\}.*:ALL append_privs=yes password=foo
  with_nested:
    - [ 'alice', 'bob' ]
    - [ 'clientdb', 'employeedb', 'providerd']
|
ハッシュループ(with_dict)
 1
 2
 3
 4
 5
 6
 7
 8
 9
10
11
12
13
|
---
vars:
  users:
    alice:
      name: Alice Appleworth
      telephone: 123-456-7890
    bob:
      name: Bob Bananarama
      telephone: 987-654-3210
tasks:
  - name: Print phone records
    debug: msg="User \{\{ item.key \}\} is \{\{ item.value.name \}\} (\{\{ item.value.telephone \}\})"
    with_dict: "\{\{users\}\}"
|
ファイルリストループ(with_fileglob)
with_fileglobを利用し、フォルダ以下のファイルをループに代入することができる。
1
2
3
4
5
6
7
8
9
|
tasks:

    # first ensure our target directory exists
    - file: dest=/etc/fooapp state=directory

    # copy each file over that matches the given pattern
    - copy: src=\{\{ item \}\} dest=/etc/fooapp/ owner=root mode=600
      with_fileglob:
        - /playbooks/files/fooapp/*
|
ブロック(block)
複数actionをブロックに纏めて、設定した条件に合致した場合、全actionが一括に実行される。
 1
 2
 3
 4
 5
 6
 7
 8
 9
10
11
12
13
14
|
tasks:
     - block:
         - yum: name=\{\{ item \}\} state=installed
           with_items:
             - httpd
             - memcached

         - template: src=templates/src.j2 dest=/etc/foo.conf

         - service: name=bar state=started enabled=True

       when: ansible_distribution == 'CentOS'
       become: true
       become_user: root
|
異常処理をするときに、blockが便利でよく使われている。
 1
 2
 3
 4
 5
 6
 7
 8
 9
10
11
|
tasks:
  - block:
      - debug: msg='i execute normally'
      - command: /bin/false
      - debug: msg='i never execute, cause ERROR!'
    rescue:
      - debug: msg='I caught an error'
      - command: /bin/false
      - debug: msg='I also never execute :-('
    always:
      - debug: msg="this always executes"
|
既存Playbook の読み込む
既存のPlaybookを利用することで、開発時間が節約できるし、メンテナンスもしやすくなる。他のPlaybookファイルを読み込むために、以下二つが方法がある。
- include:
- 既存のPlaybook スクリプトを読み込んで利用する、簡単で利用しやすい。
- role:
- Playbookの”函数”みたいで、使い方はちょっと複雑ですが、includeより強力でいろんなことができる。Ansible Galaxyはrole方式でPlaybookをシェアしている。
Playbookファイルの include
他のPlaybookファイルを include することで、そのファイル内のtasksが利用できる。また、includeでtasksを複数のファイルに分割することで、Playbookの肥大化を防ぐことができる。
基本の使い方
直接yamlファイルをincludeする。
tasks/firewall_httpd_default.yml
1
2
3
4
5
|
---
# possibly saved as tasks/firewall_httpd_default.yml

  - name: insert firewalld rule for httpd
    firewalld: port=80/tcp permanent=true state=enabled immediate=yes
|
他のPlaybookでのinclude方法は
1
2
|
tasks:
    - include: tasks/firewall_httpd_default.yml
|
高度な使い方
includeされるPlaybookの中で変数を定義することができる。下記の例では、includeされたtasks/firewall_httpd_default.ymlの中に{{ port }}でport変数を定義した。
1
2
3
|
---
  - name: insert firewalld rule for httpd
    firewalld: port=\{\{ port \}\}/tcp permanent=true state=enabled immediate=yes
|
変数の値をincludeされるPlaybookに渡すために、以下の方法がある。
includeされるPlaybookの後ろに、変数名と値を指定
1
2
3
4
|
 tasks:
    - include: tasks/firewall.yml port=80
    - include: tasks/firewall.yml port=3260
    - include: tasks/firewall.yml port=423
|
YAMLのハッシュ形式で変数と値を渡す
1
2
3
4
5
6
7
8
|
 tasks:

    - include: wordpress.yml
      vars:
          wp_user: timmy
          ssh_keys:
            - keys/one.txt
            - keys/two.txt
|
taskをJSON形式に書いて、変数と値を設定する
1
2
|
 tasks:
   - { include: wordpress.yml, wp_user: timmy, ssh_keys: [ 'keys/one.txt', 'keys/two.txt' ] }
|
Playbook中で定義済みの変数は、特に渡す必要がなく、そのままりようされる。
1
2
3
4
5
6
7
|
 ---
  - hosts: lb
    vars:
      port: 3206
    remote_user: root
    tasks:
      - include: tasks/firewall.yml
|
Includeの落とし穴
- handlers内でPlaybook を include する。
書き方は以下に示す。
1
2
|
 handlers:
    - include: handlers/handlers.yml
|
ただし、上記の使い方は、有効と書いたドキュメントがあるが、無効と書いたドキュメントもあり、矛盾している。
無効と書いたURL:http://docs.ansible.com/ansible/playbooks_intro.html
有効と書いたURL:http://docs.ansible.com/ansible/playbooks_roles.html#task-include-files-and-encouraging-reuse
下記のテストの結果、Ansible 1.9では、includeされたhandlerを呼び出すことができないが、Ansible 2.0以降であれば、includeされたhandlerを呼び出すことができる。そのため、利用しているAnsibleのversionを確認する必要がある。
 1
 2
 3
 4
 5
 6
 7
 8
 9
10
11
12
13
14
15
16
17
18
|
 ---
  - hosts: lb
    user: root
    gather_facts: no
    vars:
        random_number: "\{\{ 10000 | random \}\}"
    tasks:
    - name: Copy the /etc/hosts to /tmp/hosts.\{\{ random_number \}\}
      copy: src=/etc/hosts dest=/tmp/hosts.\{\{ random_number \}\}
      notify:
        - restart apache
        - restart apache in handlers


    handlers:
      - include: handlers/handlers.yml
      - name: restart apache
        debug: msg="This is the handler restart apache"
|
推奨されない使い方で、パラメータが利用できないなどの制限がある。
 1
 2
 3
 4
 5
 6
 7
 8
 9
10
11
12
13
|
 - name: this is a play at the top level of a file
    hosts: all
    remote_user: root

    tasks:

    - name: say hi
      tags: foo
      shell: echo "hi..."
  # 全体include,またはplaybook include
  - include: load_balancers.yml
  - include: webservers.yml
  - include: dbservers.yml
|
Playbookの”Package”(role)
Roleはincludeよりもっと柔軟で強力なコードシェア方法を提供する。includeは他のプログラミング言語の”include”と似たような使い方で、1つのファイルした利用できない。それに対し、roleは”Package”みたいな使い方で、複数のファイルを同時参照によって1つの機能を利用できる。例えば、apacheのインストールと設定をする時、tasksでパッケージのインストール、テンプレートファイルと設定ファイルのコピー、handlerでのサービス再起動など、こちらの処理を1つのroleに纏めることによって、他のPlaybookに参照し利用されることができる。
Ansibleではroleの利用を推奨していて、roleをシェアするためのプラットフォーム Ansible Galaxy https://galaxy.ansible.com/ を提供している。そこでは他の人が書いたroleを参照し利用することができる。
roleのディレクトリ構造
Ansibleでは、決まったディレクトリ構造でroleを定義する。具体的な例を以下に示す。
この例では、名前がmyroleのroleが定義され、site.ymlで参照している。
 1
 2
 3
 4
 5
 6
 7
 8
 9
10
11
12
13
14
15
16
17
18
19
|
site.yml
roles/
├── myrole
    ├── tasks
    │   └── main.yml
    ├── handlers
    │   └── main.yml
    ├── defaults
    │   └── main.yml
    ├── vars
    │   └── main.yml
    ├── files
    ├── templates
    ├── README.md
    ├── meta
    │   └── main.yml
    └── tests
        ├── inventory
        └── test.yml
|
site.ymlでroleを参照
1
2
3
4
|
---
- hosts: webservers
  roles:
     - myrole
|
roleを作成する時に上記すべてのディレクトリとファイルが必須ではないが、このroleが実現したい機能と仕様によって対応するディレクトリとファイルを作成する。下記は各ファイルの役割をしめす 。
| ファイル |
役割 |
roles/x/tasks/main.yml |
ファイル内のtasksがPlaybookに追加される。そのため、このファイルはroleの入り口である。このroleの詳細を知りたい場合は、このファイルから参照したほうが良い |
roles/x/handlers/main.yml |
ファイル内のhandlersがPlaybookに追加される。 |
roles/x/vars/main.yml |
ファイル内のvariablesがPlaybookに追加される。 |
roles/x/meta/main.yml |
ファイル内のロール情報がPlaybookのrolesリストに追加される。 |
roles/x/tasks/main.yml でのすべてのtasksは、roles/x/{files,templates,tasks}のファイルを直接参照でき、ファイルパスを指定する必要がない。自分でroleを書くときに、一般的には roles/x/tasks/main.yml を作成する。他のファイルとディレクトリは、必要によって追加する。
以下では、具体の例を通してroleの書き方と使い方を紹介する。
Roleで変数を使う
変数付きのmyroleのディレクトリ構造を以下に示す。
1
2
3
4
5
|
main.yml
 roles
   role_with_var
     tasks
       main.yml
|
以下の様に、roles/myrole/tasks/main.yml で\{\{ \}\}を使って変数を定義する。
1
2
3
|
---
 - name: use param
   debug: msg="\{\{ param \}\}"
|
それで、main.ymlで以下のようにmyroleを利用することができる
1
2
3
4
5
6
|
---

- hosts: webservers
  roles:
    - { role: myrole, param: 'Call some_role for the 1st time' }
    - { role: myrole, param: 'Call some_role for the 2nd time' }
|
YAMLの辞書型に書くと
1
2
3
4
5
6
7
8
|
---

- hosts: webservers
  roles:
    - role: myrole
      param: 'Call some_role for the 1st time'
    - role: myrole
      param: 'Call some_role for the 2nd time'
|
変数のデフォルト値
変数のデフォルト値が設定された場合、roleを読み込むときにもし変数に対し新しい値が渡された場合、その新しい値を利用する。もし変数に新しい値を渡していない場合、変数はデフォルト値を利用する。
デフォルト値の設定はとても簡単で、上記のrole_with_varを例にする
1
2
3
4
5
6
7
|
main.yml
roles:
  myrole
    tasks
      main.yml
    defaults
      main.yml
|
roles/myrole/defaults/main.ymlでparamの値を定義する。
1
|
param: "I am the default value"
|
これによって、main.ymlでは以下の二つの方法でroleを読み込むことができる。
1
2
3
4
5
|
---
- hosts: webservers
  roles:
    - role_with_var
    - { role: role_with_var, param: 'I am the value from external' }
|
他の例については https://github.com/shijingjing1221/ansible-first-book-examples/blob/master/role_vars.ymlを参照する
roleとwhenと一緒に実行
下記の例では、my_roleはRedHat系のサーバー上しか有効にならない。
1
2
3
4
|
---
- hosts: webservers
  roles:
    - { role: my_role, when: "ansible_os_family == 'RedHat'" }
|
YAML辞書型で書くと以下になる。
1
2
3
4
5
6
|
---

- hosts: webservers
  roles:
    - role: my_role
      when: "ansible_os_family == 'RedHat'"
|
roleとtaskの実行順番
Playbookでは、roleとtasksが同時にある時に、どちらが先に実行になる?答えが以下のようになる。
pre_tasks > role > tasks > post_tasks
例で示すと、以下のPlaybookに対し
 1
 2
 3
 4
 5
 6
 7
 8
 9
10
11
12
13
14
15
16
17
18
19
|
---

- hosts: lb
  user: root

  pre_tasks:
    - name: pre
      shell: echo 'hello'

  roles:
    - { role: some_role }

  tasks:
    - name: task
      shell: echo 'still busy'

  post_tasks:
    - name: post
      shell: echo 'goodbye'
|
実際に実行した結果は以下になる。
 1
 2
 3
 4
 5
 6
 7
 8
 9
10
11
12
13
14
15
16
17
18
19
20
21
22
|
PLAY [lb] **********************************************************************


TASK [setup] *******************************************************************
ok: [rhel7u3]

TASK [pre] *********************************************************************
changed: [rhel7u3]

TASK [some_role : some role] ***************************************************
ok: [rhel7u3] => {
    "msg": "Im some role"
}

TASK [task] ********************************************************************
changed: [rhel7u3]

TASK [post] ********************************************************************
changed: [rhel7u3]

PLAY RECAP *********************************************************************
rhel7u3                    : ok=5    changed=3    unreachable=0    failed=0
|
Playbookの内容が多い時、一部しか実行したくない場合、Playbookのtagsを使って一部のtasksを実行できる。
以下の例では、example.ymlの中にpackagesとconfiguration 二つのtagが書かれている。
 1
 2
 3
 4
 5
 6
 7
 8
 9
10
11
12
13
14
15
16
17
|
tasks:

  - yum: name=\{\{ item \}\} state=installed
    with_items:
       - httpd
    tags:
       - packages

  - name: copy httpd.conf
    template: src=templates/httpd.conf.j2 dest=/etc/httpd/conf/httpd.conf
    tags:
       - configuration

  - name: copy index.html
    template: src=templates/index.html.j2 dest=/var/www/html/index.html
    tags:
       - configuration
|
tag変数を付けずに実行すると、すべてのtasksが実行される。
1
|
ansible-playbook example.yml
|
パッケージのインストールのみ実行したい時に、tagsでpackagesを指定してPlaybook を実行する。
1
|
ansible-playbook example.yml --tags "packages"
|
configurationの部分を実行しない場合、skip-tagsでconfigurationを指定してPlaybook を実行する。
1
|
ansible-playbook example.yml --skip-tags "configuration"
|
タグの名前がユーザで決めるが、alwaysに設定するとタグの意味が特殊になる。Playbookを実行するときに、alwaysタグを実行しないことを明示的に示さないと、このタグは実行される。
下記の例では、
 1
 2
 3
 4
 5
 6
 7
 8
 9
10
11
12
13
14
15
|
 tasks:

    - debug: msg="Always print this debug message"
      tags:
        - always

    - yum: name=\{\{ item \}\} state=installed
      with_items:
         - httpd
      tags:
         - packages

    - template: src=templates/httpd.conf.j2 dest=/etc/httpd/conf/httpd.conf
      tags:
         - configuration
|
packagesタグのみ実行しても、alwaysタグのtaskも実行される。
1
|
ansible-playbook tags_always.yml --tags "packages"
|
以下のPlaybookに対し
1
2
3
4
5
6
7
|
 tasks:

    - debug: msg="I am not tagged"
      tags:
        - tag1

    - debug: msg="I am not tagged"
|
それぞれのコマンドにtagged, untagged, allを指定して実行してみましょう
1
2
3
|
 ansible-playbook tags_tagged_untagged_all.yml --tags tagged
 ansible-playbook tags_tagged_untagged_all.yml --tags untagged
 ansible-playbook tags_tagged_untagged_all.yml --tags all
|
下記のようにincludeの中にtagsを設定することができる。
1
2
|
- include: foo.yml
  tags: [web,foo]
|
rolesの中のタグを参照したい場合は、以下の例で示す。
1
2
|
roles:
  - { role: webserver, port: 5000, tags: [ 'web', 'foo' ] }
|
Ansibleのモジュールドキュメント(http://docs.ansible.com/ansible/latest/modules/modules_by_category.html)を参照する時に、各ページの一番下に、このモジュールは”Core module”または”Extra Module”であることを示している。例えば、yumはcore moduleが、yum_repositoryはextra moduleである。
- Core Module
- 特に設定やインストールする必要がなく、Ansibleをインストール後に使える。
- よく使われているmodule
- テスト済み
- Extra Module
- 設定やインストールをしてから利用する。
- 比較的に使用頻度が低い
- bugが存在している可能性がある。
以下の手順でExtra moduleをのインストールと設定を行うと、コマンドラインとPlaybookで利用できる。Extra Module は Core Module と同じ使い方で利用できる。
注意:Extra moduleがテストされ問題ない場合はCore Moduleに移動される。
1
|
git clone https://github.com/ansible/ansible-modules-extras.git
|
例として、ダウンロード先は/home/jshi/software/になっている。このパスは後で利用する。
- 方法1:デフォルトのAnsible設定ファイルを変更
/etc/ansible/ansible.cfgを編集し、下記 1 行を追加
1
|
library = /home/jshi/software/ansible-modules-extras/
|
- 方法2:カレントディレクトリの下にあるansible.cfgを変更
この方法は、同じくカレントディレクトリにあるplaybookのみに有効になる。他の親ディレクトリや子ディレクトリのPlaybookには無効になる。
下記のディレクトリ構造に対し、ansible.cfgを変更した後、use_extra_module.ymlのみextra moduleが利用できる。
1
2
3
4
|
library/ansible-modules-extras
ansible.cfg
use_extra_module.yml
subfolder/use_extra_module_will_throw_error.yml
|
カレントディレクトリにあるため、設定内容は相対パスでも大丈夫。
1
|
library = library/ansible-modules-extras/
|
方法3:環境変数を修正する
1
|
export ANSIBLE_LIBRARY=/project/demo/demoansible/library/ansible-module-extras
|
もし再起動後も有効にしたい場合、~/.bashrcでANSIBLE_LIBRARY環境変数を設定する。
1
2
3
4
5
6
7
|
$ echo >>~/.bashrc <<EOF

export ANSIBLE_LIBRARY=/project/demo/demoansible/library/ansible-module-extras

EOF

$ source ~/.bashrc
|
コマンドラインでモジュールの使い方を参照
Bashのman命令みたいに、ansibleはコマンドラインでmoduleの使い方が参照できる。コマンド名は ansible-doc である。
1
|
ansible-doc module_name
|
Core Moduleに対しはどこで実行しても問題がない、例えばyumのを参照したい場合
Extra Moduleに対しては、extra moduleの利用を設定したディレクトリの下でコマンドを実行する。
1
|
ansible-doc yum_repository
|
より良いPlaybookの書き方
- Includeとroleを使って、重複がないコードを書く
- 大きいファイルを小さいファイルに分割して書く
https://github.com/ansible/ansible-examples
 1
 2
 3
 4
 5
 6
 7
 8
 9
10
11
12
13
14
15
16
17
18
19
20
21
22
23
24
25
26
27
28
29
30
31
32
33
34
35
36
37
38
|
production                # inventory file for production servers
staging                   # inventory file for staging environment

group_vars/
   group1                 # here we assign variables to particular groups
   group2                 # ""
host_vars/
   hostname1              # if systems need specific variables, put them here
   hostname2              # ""

library/                  # if any custom modules, put them here (optional)
filter_plugins/           # if any custom filter plugins, put them here (optional)

site.yml                  # master playbook
webservers.yml            # playbook for webserver tier
dbservers.yml             # playbook for dbserver tier

roles/
    common/               # this hierarchy represents a "role"
        tasks/            #
            main.yml      #  <-- tasks file can include smaller files if warranted
        handlers/         #
            main.yml      #  <-- handlers file
        templates/        #  <-- files for use with the template resource
            ntp.conf.j2   #  <------- templates end in .j2
        files/            #
            bar.txt       #  <-- files for use with the copy resource
            foo.sh        #  <-- script files for use with the script resource
        vars/             #
            main.yml      #  <-- variables associated with this role
        defaults/         #
            main.yml      #  <-- default lower priority variables for this role
        meta/             #
            main.yml      #  <-- role dependencies

    webtier/              # same kind of structure as "common" was above, done for the webtier role
    monitoring/           # ""
    fooapp/               # ""
|
参考資料
Ansibleのビデオセッション(英文) https://sysadmincasts.com/episodes/43-19-minutes-with-ansible-part-1-4
本資料にあるすべての例
https://github.com/shijingjing1221/ansible-first-book-examples/
YAMLの基本文法と紹介
https://en.wikipedia.org/wiki/YAML
http://www.yamllint.com/
Ansible Tower紹介
https://www.ansible.com/tower
CopyRight
此书电子版免费供大家下载阅读,如果您已为此副本付费,请立即申请退款并联系作者举报此行为。请注意,虽然此书电子版免费供大家阅读,但这并不代表作者放弃了版权,您在未经授权的情况下依然不得以任何方式复制或抄袭本书内容。此书的电子版目前仅授权图灵社区和gitbook.com两个平台发布,如果您通过其他渠道获取到了此副本,则是侵权行为,请到上述两个平台下载合法授权的副本。获取合法授权副本的好处是可以及时得到此书的最新版本,早期版本中的错误会被及时纠正。感谢您对版权保护工作所做出的贡献。
作者邮箱:[email protected]
作者Github: https://github.com/shijingjing1221/
Demo
https://www.youtube.com/watch?v=vOa4_1fgNPU
 times read